

One of the best things about my job this year was the ability to completely immerse myself in Medieval culture. From the clothes to the swordplay and chivalry to the dances and jester acts, I was learning alongside my students and kept trying to infuse my enthusiasm into each lesson. While that didn't always work, they were interested in the food!
In preparation for our "dinner theatre" presentation, I spent a lot of time researching the cornerstone of every Medieval citizen's diet - bread. Regardless of class, grains (usually in the form of various breads) provided 65–70% of calories in the early 14th century! Obviously, I love making bread as much as my mom loves to eat it, but in my studies I came across a most unusual formula for the "authentic" peasant bread. Apparently in those ages,there was something of a hierarchy amongst the bread eaters. The "upper crust" (excuse the pun) were given the most refined, smoothest-texture and purest flour for their bread, and the resulting loaves - called manchet - were similar to our "whole wheat" today. Next were the middle class, who didn't get quite the purity in their ground grains, nor the resources to make perfectly smooth doughs with heavy refining. These slightly irregular loaves were called maslin - and in fact about 7 years ago I made some of this myself. It's a perfectly acceptable loaf to taste, and for those who love dark pumpernickel style loaves it is definitely a winner for the table.
Lastly was the bread for the poor, who could only afford the miller's last grinds of the day. These grains were usually a medley of all sorts of grains, seeds and even legumes - the emptying of a grain sack that might have been intended for the horses or cattle - along with the debris swept from the shop floor. Obviously these were not finely milled, nor sieved, and the resulting loaves often required lengthy rising times. This lent a sour flavour to the dough, and even with the extended fermentation the bread was not a high-riser. Dense and hearty, it was sustenance more than anything for the impoverished, who would also feed it to their livestock in times of famine - hence the name horsebread.
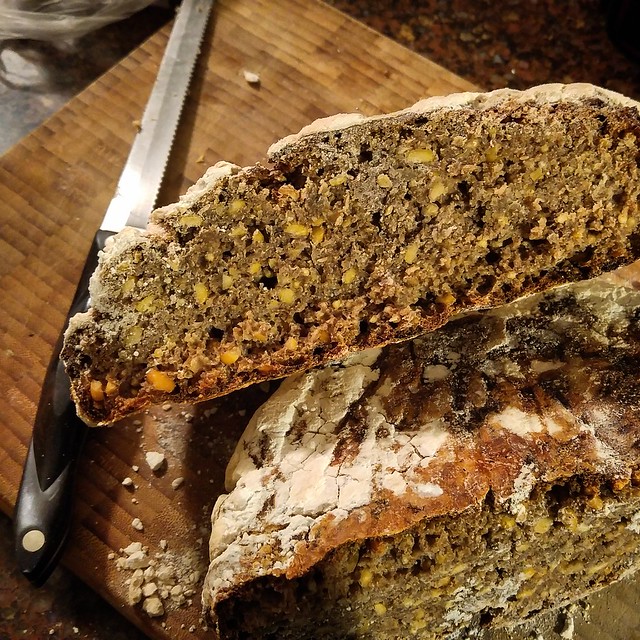
It was this type of bread I was interested in creating as an example for my class, who would be able to taste it as part of their lessons. I have to admit that it is a rather sour loaf - which I loved personally - but the texture is unlike anything available today and definitely wouldn't appeal to children. That said, for my family, a smear of honey butter or jam on a freshly oven-warmed slice was the perfect combination while the loaf was around. With just a tad of extra refining, I would eat it again!
Of course, this isn't a complete recreation of Medieval bread baking. However, I loved this resource, which actually details the steps for a more accurate reenactment!
Medieval Horsebread
Makes 1 large loaf, 20 slices
50 grams pot barley
water
100 grams dried yellow split peas
200 grams active sourdough starter
250 grams whole wheat bread flour
200 grams multigrain flour
50 grams chickpea flour
10 grams salt
- Place barley in a jar and cover with water. Seal jar and let stand 24 hours.
- Drain, saving the liquid, rinse and place back in the jar. Cover with a towel and let stand, turned upside down, overnight. Repeat the rinse / drain process three times more, saving the water each time.
- Wash dried yellow split peas and place them in a medium sized bowl. Cover with water and leave overnight to soak.
- Mix together the starter, flours, salt and 350 mL barley water (drained from step 2) until a thick wet dough forms. Leave in the fridge, covered, overnight. Let stand at room temperature 1 hour to warm up before proceeding.
- Drain split peas and add to a food processor with the barley. Pulse to coarsely chop, set aside.
- Knead rested dough for 10 minutes with the dough hook or 20 minutes by hand, adding flour as necessary to achieve a slightly sticky, but not wet, dough.
- Knead in the chopped split pea mixture.
- Form into a ball and place on a heavily floured tea towel.
- Place towel-wrapped loaf in a basket, bowl or banneton and leave to rise 24 hours at cool room temperature (don’t try to shortcut this step - it’s a heavy loaf and needs a *long* rise).
- Place a large baking tray or pizza stone in the oven and heat oven to 450F (preferably convection).
- Turn loaf out onto a parchment lined rimless baking sheet or pizza peel and transfer to the hot pan or baking stone.
- Score loaf with a sharp knife and place in the oven.
- Bake for 10 minutes, then turn the oven to 425F (preferably convection) and bake another hour.
- Turn out on a wire rack to cool.
Amount Per Serving
Calories: 128.4
Total Fat: 0.7 g
Cholesterol: 0.0 mg
Sodium: 194.9 mg
Total Carbs: 26.2 g
Dietary Fiber: 4.7 g
Protein: 5.8 g

No comments :
Post a Comment
Thanks for the feedback!