Showing posts with label Beverages. Show all posts

Friday, September 19, 2025

Adagio Tea's fall flavour lineup beats a PSL any day!

OK, so hot take (at least in some circles) - I loathe Pumpkin Spice Lattes. I'm not a fancy coffee gal at the best of times - the most you'll find me with is a couple shots of espresso and maybe a splash of almond milk. When it comes to tea, though, I love all things flavourful - fruity or spiced, genmaicha, oolong.... the list goes on. If you love to add some spice to your fall beverages, my friends at Adagio Teas are releasing two new flavours that are perfect for your collection. 

From Adagio Teas

The Adagio family added both a black tea and a honeybush tisane this year, so whether you're looking for that little kick of caffeine in the morning or you're avoiding stimulants, there is an option for you!

 So what do they taste like, you wonder? I'll let Adagio take the lead on this description:

From Adagio Teas:

The cult of the pumpkin spice latte may reign supreme in coffee shops, but more and more consumers are seeking lower-sugar, calming alternatives that don’t sacrifice flavor. Adagio’s teas deliver all the warmth, aroma, and nostalgia of fall in a cup, whether you’re steeping for a solo moment of calm or crafting a homemade tea latte.
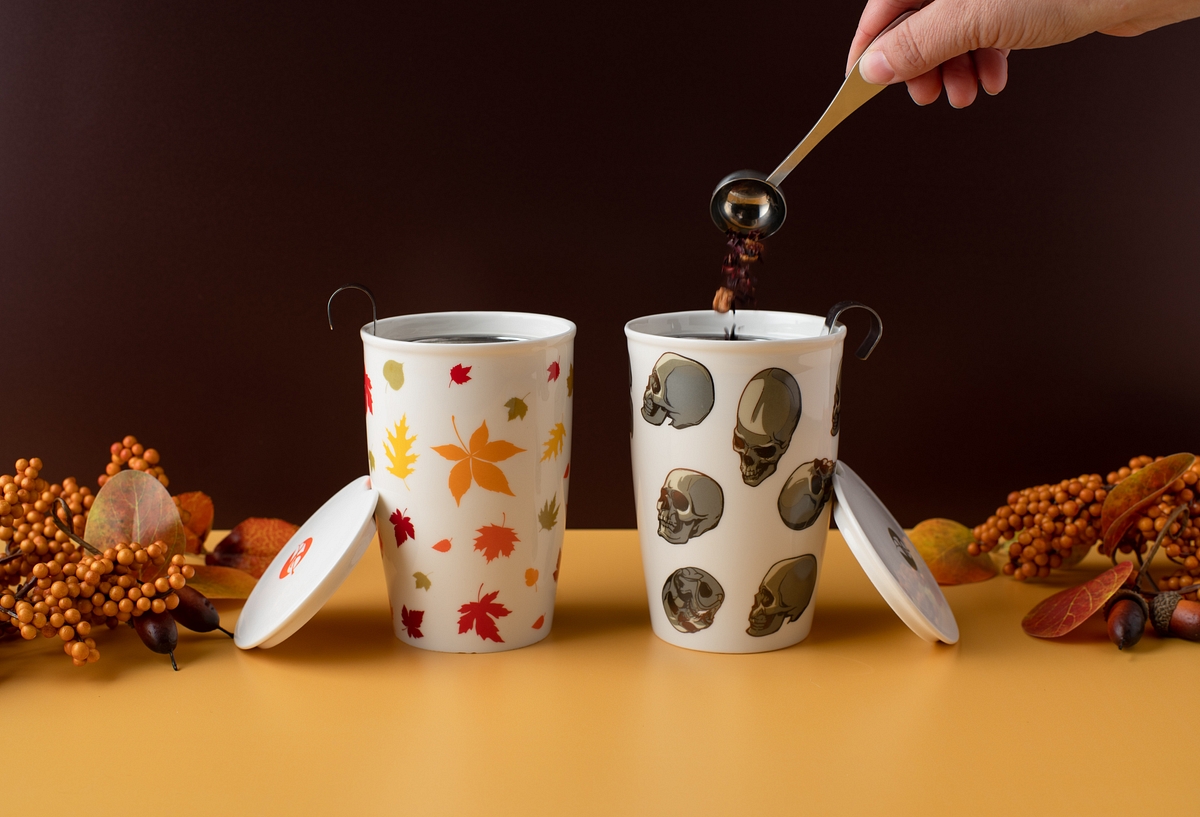
  • Pumpkin Spice (Black Tea): A robust blend featuring real cinnamon, ginger, cloves, and natural pumpkin spice flavor. It’s bold enough to enjoy on its own and smooth enough to steam into a DIY PSL-style latte.
  • Honeybush Pumpkin Chai (Caffeine-Free): A naturally sweet, herbal blend made with South African honeybush, chai spices, and a gentle pumpkin note. Its mellow, caffeine-free profile makes it ideal for cozy evenings or mindful sipping
    Honestly, my favourite of the two is the Pumpkin Spice black tea. It feels like a warm, invigorating hug early in the morning and the smell of it makes my office smell amazing. The honeybush variety is also delicious, but for me its a bit sweet. Don't worry though, I know exactly what I'll be making with that tea in the future!

    Meanwhile, why not take a look at some of these tea recipes and try them out with one of Adagio's offerings?
    • London Fog - if you want extra spice, use Adagio Bee's Pumpkin Spice Honey to sweeten! 

    • Make an iced Honeybush Pumpkin Chai and add this Pumpkin Cream Cold Foam!

    • Non-Alcoholic Mulled Tea - Steep your tea of choice until nice and dark, then strain and simmer with orange slices and sugar to taste for 20 minutes.

    • Pumpkin-Pecan Pie Chai - Steep 2 tsp of Honeybush Pumpkin Chai tea in 1 cup warm milk or milk alternative for 5-6 minutes. Strain and return to the pot, then stir in 1 tbsp of Butter Pecan syrup (storebought or homemade)

    Monday, January 13, 2025

    The Best Coffees for Fuelling Your Home Office Productivity


    Working from home can be delightful, yet challenging when it comes to maintaining high productivity levels. Many professionals rely on a good cup of coffee to kickstart their day and keep the momentum going. But not all coffees are created equal. Explore the finest types of coffee that promise to elevate your focus and efficiency while you conquer your tasks from the comfort of your home office.

    Discover the Power of Single-Origin Beans

    Single-origin coffee beans come from a specific area, and they are renowned for their unique flavour profiles. Such beans can significantly enhance your coffee experience, providing the sensory motivation needed to stay focused. Whether it's a floral Ethiopian Yirgacheffe or a chocolaty Sumatra, a single-origin cup can be just the trick to refine your palate and your home office effectiveness.

    Why Blended Coffees Are Worth Your Time

    Blends combine beans from various regions, creating a balance of flavours that many coffee enthusiasts swear by. For those long hours of meetings or project marathons, a well-crafted blend can offer a consistent taste and caffeine level. Try a medium roast with a balance of South American and African beans for a smooth day-long energy provision.

    The Role of Espresso in Peak Productivity

    When deadlines loom and the pressure mounts, espresso is the go-to for a quick and powerful caffeine boost. A finely tuned espresso can deliver a single shot laden with complexity and vigor, propelling you through tough afternoons. For those who juggle multiple tasks, maintaining an espresso machine in your home office could be a game changer.

    Enhancing Your Coffee: Add a Twist with Tiramisu Coffee Enhancer

    Besides choosing the right type of coffee, adding something extra like a tiramisu coffee enhancer could enrich your coffee break, giving you not just a caffeine boost but also a delicious twist to your day. The sweet and creamy flavour could soothe your senses and refresh your mind, perfect for when you need a midday treat to keep up the productivity.

    The Art of Brewing Coffee at Home

    Making a great cup of coffee at home is as much about the process as it is about the coffee itself. Experimenting with different brewing methods—like the pour-over, French press, or AeroPress—can help you discover new depths of flavour. Each method brings out unique notes and textures, allowing you to tailor your coffee to suit your day. Whether you prefer a bold brew or a lighter, more nuanced cup, mastering a brewing technique can make your coffee moments even more rewarding

    Cold Brew: A Gentle Yet Effective Approach

    For those who prefer a less acidic and smoother coffee, cold brew is an excellent choice. Its slow brewing process at a lower temperature preserves flavours and delivers caffeine in a gentler form. This type of coffee could be ideal for those who find regular coffee too harsh but still need a stable energy flow.

    Stay energized and efficient with the right choice of coffee for your home office. Whether it's the rich depth of a single-origin, the balanced harmony of a blend, or the quick hit of an espresso, make sure your coffee is enhancing your productivity. Don't forget, adding a special touch like the tiramisu coffee enhancer can transform your coffee break into a luxurious recharge moment.

    In the end, remember that the best coffee is the one that suits your taste and energy needs. Experiment with different types and enhancements to find that perfect coffee that not only wakes you up but also increases your pleasure and efficiency while working from home. Cheers to a productive and aromatic journey in your home office!


    Tuesday, January 24, 2023

    Dry January and February Made Simple with Jordan's Skinny Mixes

    After a long overdue holiday season, where most of us were having larger groups, parties and other special events, we all need a bit of a reset. Dry January was started in the UK in 2012 as part of a public health initiative, and now millions of people around the world make the choice to abstain from wine, beer and liquor for the month. Making that small change not only helped the pocketbooks of participants - let's face it, alcohol is an expensive hobby - but a study in BMJ Open found that those "who abstained from alcohol for 30 days slept better, had more energy, and lost weight" as well as lower blood pressure, cholesterol and cancer-related proteins in their blood.(link).

     Dry January not only impacts your health habits for the first 31 days of the year though - the above mentioned benefits were shown to continue due to the fact participants had changed their alcohol consumption patterns. Given that the rough estimate of the amount of time needed to break a habit is 28 days, this isn't surprising! In Canada, the Canadian Cancer Society keeps the momentum going with Dry February, which combines alcohol abstinence with fundraising for cancer research.

    Sounds great, right? But what about the birthdays, get togethers, game nights.... all those social events that inevitably happen? Harvard Medical School has some pointers:

    • Find a substitute non-alcoholic drink. For social situations, or when you crave a cocktail after a long day, reach for alcohol-free beverages like sparkling water, soda, or virgin beverages (non-alcoholic versions of alcoholic drinks.)
    • Avoid temptations. Keep alcohol out of your house. When you are invited to someone’s home, bring your non-alcoholic drinks with you.
    • Create a support group. Let friends and family know about your intentions and encourage them to keep you accountable. Better yet, enlist someone to do the challenge with you.
    • Use the Try Dry app. This free app helps you track your drinking, set personal goals, and offers motivational information like calories and money saved from not drinking. It’s aimed at cutting back on or cutting out alcohol, depending on your choices.
    • Don’t give up. If you slip up, don't feel guilty. Just begin again the next day.


    Jordan's Skinny Mixes is making that first suggestion a little easier on everyone with their great lines of syrups and flavour infusions - from Cherry, to Meyer Lemon and Raspberry (my favourite!) and very unique Strawberry Rose, Mermaid and Unicorn flavours, mocktails take on a whole new life. I love using the Cherry Limeade Flavor Burst in my water when I need incentive to drink more - it's the perfect mix of sweet and tart.

    Sugar free, with options for naturally sweetened and Keto syrups with added MCT, there is something for everyone. If sweet coffee your thing but trying to cut back on drinking your calories? Check out their vanilla, hazelnut or mocha syrups with zero calories and all the flavour!


    Check out more: https://www.skinnymixes.com/

    Need inspiration? Try these recipes from Jordan's:

    Sober Mermaid:


    Not So Spiked Raspberry Lemonade:


    Cherry Limeade:


    Shirley Temple:

    • 8 ounces of diet ginger ale

    • Sugar Free Cherry Syrup - tablespoon, build up the flavor as desired.

    • Maraschino cherries - garnish 

    Monday, July 11, 2022

    Chocolate Cold Brew using @lardera_coffee

    I "discovered" cold brew coffee a few weeks ago, but it was a hassle to make at home with what I had. Enter Lardera Coffee Roasters and their cold brew pitcher. Simply put your preferred coffee grounds into the stainless steel filter core and fill with cold water (more instructions will be on my blog post - don't worry!) and let steep overnight. The result is smooth and delicious straight (if, like me you like black coffee) or jazzed up like in my Chocolate Cold Brew.

    Jump to Recipe

    Like most trends, I'm really late to the party when it comes to cold brew coffee. I'm a hot coffee drinker through and through - and since I drink it black, I'm picky about what I have in my cup. The idea of chilled coffee always felt a bit weird too - I associated cold coffee with when I was teaching and my neglected cup sat ignored on my desk for far too long. 

    That changed this summer, when we got a heatwave that gripped us in 40°C (104°F) days and rendered the thought of eating or drinking anything hot impossible. I had seen the ads for Starbucks' cold brew drinks and it inspired me to try making my own cold brew at home, where I could control the ingredients and make a large cup without shelling out $10. My original method of soaking ground beans in water (in my trusty litre Mason jars) then straining it through a filter worked, but was messy and a bit of a pain to babysit. 

    When Lardera Coffee (sister company to Adagio Teas and Selefina Spices) approached me with a new cold-brew pitcher, I was immediately sold for a few reasons:

    1. Capacity: the pitcher is 44 fl oz, which is perfect for me to sip through on a Saturday (yes, I am a caffeine addict) or to make more moderate sized drinks for a group

    2. Material: the pitcher is glass, with a silicone band for grip. The glass keeps the taste of the coffee pure, which I appreciate (and yes, this means the better coffee you buy, the better it will taste). The glass look is also gorgeous to serve from, and the pitcher has a lid that fits snugly on the infuser insert or loosely on the pitcher so it keeps your coffee clean.

    3. Cost and convenience: I don't need to tell you that making coffee of any kind at home is going to be cheaper than going to your local coffee shop. The cold-brew pitcher here is only $24USD. Even with buying better beans, you get a lot more bang for your buck this route, and if you're like me, you want to enjoy coffee in your PJs, not schlepping out to the cafe.

    My only critique of the pitcher has to do with an absolute lack of instructions. Not having really made cold brew before, I had to look up coffee:water ratios on another website before beginning since there are no guides in or on the box. I found the best flavour (for me) with 105g of ground coffee to the 44 fl.oz of water.

    Lardera also offers a bunch of coffee varieties on their website, including samples for those who aren't quite sure what they're after in the flavour department. I sampled both Kenya Washed and Catuai Honey as cold brews, and I prefer Catuai Honey as a straight "pick me up" cup with a bit of ice while the Kenya Washed is perfect for more dessert-y drinks like the recipe below.

    If you've never tried cold brew before, I definitely suggest making it at home and playing with it until you find what you like. This summer is going to be a long one, and its a great way to keep cool. 

    Friday, August 6, 2021

    Bella Luna Spritzer with Adagio Teas' #bellalunablue

    It's Friday! Why not kick off the weekend with this Bella Luna Spritzer - a blend of limoncello, lemon lime soda and Adagio Teas Bella Luna Blue loose leaf tea is irresistibly summery and a perfect beverage on the porch or at the cottage.
     

    Now that the rules about gatherings are somewhat less stringent around here, people are beginning to gather on patios and each other's backyards. While it's easy to haul out a cooler with canned or bottled beverages when company is over, it's always fun to bring out something a little more fun when it's a close group of friends or a special occasion! When Adagio Teas sent me a pouch of their loose leaf tea sold exclusively on the blue moon - aptly named Bella Luna Blue - I couldn't wait to taste it and experience the colour change (made by the butterfly pea flowers) myself by adding just a hint of acid. Check out the video here.

    The tea itself has a lovely mix of blueberry and lemongrass flavours, and the lemon juice accents both perfectly. A squeeze of honey adds a good balance, but it isn't super necessary unless you like sweet tea! I knew I wanted to try making something with this when it was cold, and then the idea for a bubbly cocktail popped into my head. Why not? 

    I started by brewing a small measuring cup of the Butterfly Pea Flower Tea following their instructions (1 tsp tea leaves in a tea ball, steeped at 212°F for 10 minutes). Once brewed, I popped it in the fridge along with the bottle of Limoncello and the Sprite and let them chill overnight. The next afternoon it was a simple mix and enjoy. I made a quadruple batch since I had company that day and everyone loved the flavour and hint of sparkle it had!

    I highly recommend you get your hands on some Bella Luna Blue when it goes on sale on August 22, 2021. It's only available on that day, so don't wait!

    Sunday, October 11, 2020

    Boosted Hot Cocoa Mix with @nakednutrition

    This Boosted Hot Cocoa Mix is rich, sweet and full of nutrition thanks to Naked Nutrition's Collagen Peptides powder and Naked Rice Protein. A jar makes a great gift for a loved one, or yourself!

    I am by far a Summer person. Give me 30C weather, sun and balmy breezes all day and I am a happy camper. Once the weather gets cold, it seems like my whole body revolts and retreats into the confines of sweaters, coats (yes, even inside), blankets, hats and scarves. In addition, the cold weather often causes my rheumatoid arthritis (and associated Raynaud's phenomenon) to flare, making walking, typing, and cooking difficult (to say the least). Not only does the cold weather wreak havoc on my joints, but my whole family gets brittle nails and cracking skin once the cold sets in. Couple that with the ever-constant hand washing and sanitizer in the age of 2020 and it's a recipe for disaster! 

    Thankfully I didn't take years of nutrition training for nothing - I knew that along with the medications, balms, strengthening polishes and lotions we needed to begin healing from the inside out. A few of my friends have been using various collagen "booster" products for a while now, and kept lauding their benefits. However, their products were full of things like sugar, coconut, dairy, or other additives - stuff my body can't tolerate. On top of that, the little packets they tote around are expensive and subject to somewhat iffy marketing practices. I personally prefer using products that are not only affordable, but as bare-bones as possible so that I know exactly what I'm getting. While it may sound a little extreme, I am not willing to make sacrifices when it comes to getting my health on track.
     
    It's this mentality that aligns me with Naked Nutrition's supplements - they are up front about their ingredients and nutritional content, the source of their ingredients and (best of all) they are affordable, with simple packaging and fast delivery! I had the chance to try their Naked Rice protein powder earlier this year and my picky tastebuds fell in love with it, not to mention it's versatility in decadent cookies, croissants and gingersnaps. When the great folks at the company offered me the chance to try out their collagen powder, I was very interested, since I had done a bunch of research on it's benefits for arthritis and skin health and was willing to try anything to help! 

    Naked Collagen impressed me right off the bat with it's nutritional profile and transparency. Each tablespoon has 9g of protein and 46% of daily calcium (if you've been reading my blog for a while you know I also have osteoporosis, so this is a biggie for me too) with only 35 calories. The collagen is sourced from grass fed beef hide and is free of dairy, soy, gluten, carbohydrates, colours, flavours or sweeteners, making it suitable for almost everyone (save vegetarians and vegans). The powder is fine and easy to scoop, making measuring easy and mess-free. I started adding a scoop to my oatmeal and was pleased with how well it mixed - leading to whisking it into soup for a little extra oomph. The collagen mixes completely with no clumping (note: for the oatmeal I mixed it with the oats first then mixed it all into the water on the stovetop, and for the soup I used a mini-whisk) and adds a slightly noticeable "body" to the liquid - not thick, per se, but richer, like a bone broth that's been simmered for hours has. 

    Bolstered by that success, I decided to make hot cocoa with the Naked Collagen and Naked Rice as a little congratulatory gift to myself after finishing a term paper (they never seem to end!). Sitting down with the crossword and a big mug of it was the perfect end to my night, and I took that inspiration to create a few jars of it for holiday gifting and storing in my own pantry!
     

    Monday, August 29, 2016

    Blissful Cherry Recipes with @cheribundi

    This Summer, the temperatures have risen to record high numbers. Even though the season is winding down (I hate saying that!), it's still plenty warm, and we all need to keep well hydrated regardless of the weather! These delicious and nutritious Cheribundi Tart Cherry Juice recipes definitely make hydration a breeze - and a flavour-packed one at that. Cheribundi’s refreshing taste, and fun red color is a perfect way to drink in concentrated antioxidants, vitamins and other nutrients while making almost everything you add it to Instagram-beautiful.

    More then 150 pro and college sports teams use Cheribundi for its health benefits too, and tart cherry juice certainly has its fair share of them. These include anti-inflammation and pain relief - something that my family (including avid gardeners, gym buffs and arthritis sufferers) definitely need on a daily basis. Below are a few of Cheribundi's favourite recipes to try out for yourself!


    Cheri Pop
    Who doesn’t love an ice cold Popsicle on a blazing summer afternoon. This snack is great for a day of hanging out in the pool, or after long day at the park. So simple, so delicious, two ingredient Popsicle.
    32oz Cheribundi tart cherry juice (or any of your favorite Cheribundi variations)
    1 popsicle mold
    1. Take delicious Cheribundi juice and pour the 32oz bottle into your popsicle mold. (If the mold doesn’t come with it’s own handles, add 1 popsicle stick into the mold.) 
    2. Put the mold in the freezer until solid. 
    3. Remove the popsicles from the mold, and you have yourself a super simple frozen treat to keep you cool this summer.


    Chillin' Cheri Snowcone
    Break out that electric ice shaver you haven't used since your last kid turned 5, and turn down summer's heat wave with frosty fresh-pressed tart cherry juice snow cones.
    Electric ice shaver
    8 oz Cheribundi Tart Cherry Juice
    Ice
    1. Shave ice into a cone cup, and then pour delicious Cheribundi Tart Cherry Juice over the top.
    • You can also pour Cheribundi into ice cube trays and shave the frozen tart red juice right into the cones for a simple, delicious, healthy treat that's ready in mere seconds!

    Mom’s Cheri Treat
    Even moms need a break from the heat this summer. This icy cold treat with a little kick is the perfect solution.
    4 oz dry limeade mix
    1 Tbsp. lime juice
    4 cups cold water
    2 cups of Cheribundi tart cherry juice
    1 cup tequila
    3/4 cup triple sec
    1. Mix all ingredients into a large pitcher, and stir to combine. 
    2. Pour into plastic cups with lids and cap. 
    3. Freeze for up to 5 hours. Remove when ready to drink!

    Thanks again to the folks at Cheribundi. Not only did they share an amazing, delicious and healthy treat  with me, but their customer service staff are beyond wonderful! They went above and beyond to make sure I received my package (even when UPS didn't want to play ball) and followed up to make sure everything was A-OK! I'm looking forward to seeing their products in my local stores in the GTA.

    Saturday, February 22, 2014

    Nutella - Inspired Mocha Latte #RecipeRedux

    Have we killed the Nutella trend yet? I don't know if it's dead yet, but I think Biscoff has taken hold in the world of "spread obsession" these days, at least in the blogging world. We can't get Biscoff around here, though, and even if we could my Italian stepfamily and my chocoholic mom and sister wouldn't likely stray to that side of the table. After all, we're the family that currently has 5 "family sized" jars of the stuff, not to mention the five kilo vat my stepbrother hoards in his bedroom:


    Being in a household of Italians, we also indulge in our fair share of espresso-based beverages. While my stepbrother and I are the only two that actually enjoy the flavour of the strong coffee straight (since graduating from my childhood of cafe au laits with a shot of Baileys in the cold mornings of camping, I've always been a black-coffee person - unless Baileys or Godiva liqueur is involved!), my mom and stepdad are more into the cappuccinos, Americanos, mochas and lattes.

    It was this combination of Nutella and latte love that inspired me to try creating a drink that embodied the best of each part - the creamy, slightly nutty chocolate flavour and the unmistakeable aroma and punch of espresso. Rather than use the spread itself (which is not only a hot commodity in this household but not overly good-for-you either (what with the palm oil, sugar and fake vanilla), I went back to one of my favourite "buttery" ingredients to cook with - natural, roasted and unsweetened cashew butter. It lends a decadent "thickness" to the drink and a hint of cookie-like flavour, which also plays very well with the unsweetened almond milk I used. Of course, for a real Nutella taste, I had to add in some sort of hazelnut element, and I was all out of Frangelico... so

    The result is something you could only dream about finding at your local cafe - full of heart-healthy unsaturated fats, potassium, vitamins D & E and even a touch of protein, it's a 90-calorie treat that packs in so much more, and is delicious freshly made and piping hot or chilled into a delicious iced drink.

    This month for the #RecipeRedux we are covering all things drinkable - if it's served in a mug, glass, or stein, we're showcasing the healthier side of the cup.


    Thursday, January 2, 2014

    Oaxacan Hot Cocoa Mix

    I. Hate. Winter. It is far too cold, icy, windy and generally nasty out there to be able to appreciate the landscape (for the 5 minutes it's actually pristine white before the city grime sets in). I know that there are lots of people out there who wait all year for that first cold snap and snowfall, just so they can drag out their skis, skates, snowboards and skidoos, but in this household April can't come fast enough. Luckily enough for us, we do have a rather lovely view of the scenery from our kitchen, which is the perfect excuse to stay inside with a hot beverage and a cookie or slice of cake while catching occasional glances out the window.

    Any sort of warm food or drink was particularly important around here during the Christmas week - when our power went out due to the ice storm, the house got cold pretty quickly! Luckily for us, we were able to drag out our old Coleman stove and a half-tank of fuel, which was enough to get a decent pot of water on the boil. Between running in and out of the house (trying to find road salt for our walkway), though, our chills intensified and we needed something more sustaining (and flavourful) than lukewarm tea. That's when I broke out my jar of homemade hot chocolate, which is laced with rich flavours of almonds, bittersweet chocolate, a handful of spices and butterscotchy maca powder. Stirred into a saucepan of steaming almond milk, it thickened into a warm-your-soul brew that we all appreciated then, and continue to enjoy after any time outside these days!

    This is really a game-changer for the casual cocoa-phile who's used to tearing open a packet or picking up an overpriced, over-whipped, over-sugary concoction from the coffee shop for a quick fix. While I'm sure regular milk or even water would do just fine as a base, we actually prefer using unsweetened almond milk for a rich, extra-nutty cuppa! Made that way, it's also vegan and a great source of vitamin E! 

    Mexican Hot Cocoa

    Shared with Gluten Free Fridays.

    Monday, December 9, 2013

    Red Velvet Latte Mix

    It's been ages since I've had a real latte. I'm not talking about the syrupy sweet, cream-laden confections called lattes in the popular coffee shops, but the simple espresso + milk version you can find in Italy. To me, a coffee drink should taste like coffee first, with nuances of other elements as accents. 

    I had been kicking around the idea of a red velvet latte drink ever since the "holiday coffees" started coming out in the cafes around here. I wanted it to be full of espresso flavour, but also have a touch of tang, a hint of sweet cocoa and (of course) the vibrant red hue of the popular dessert - and after testing, tweaking and more tasting I finally found the perfect combination of ingredients for an instant latte mix. It can't be easier - whisk in some boiling water (or water and hot milk if you prefer) for an instant cup of (sugar-free) "grown up" cake batter. If you must, a dollop of whipped cream transforms a brunch delight into a decadent afternoon or dessert treat. 

    Red Velvet Latte Mix

    Friday, October 25, 2013

    Honeydew - Ginger Simple Syrup

    It never fails - whenever there's a gathering involving food, there always seems to be the quintessential fruit platter. Often, there's more than one, since several well meaning guests pick up a pre-cut tray en route to the party as a kind of hostess gift - but sadly the delicious looking produce is usually passed over in favour of the "real" dessert plates (especially at Christmas, when the cookies are plentiful and varied!). Of the next day leftovers, the first to go with my family are the berries and kiwi (Sunday morning pancake toppers), then the lunchbox-friendly grapes and stir-fry perfect pineapple. 

    But nobody here is a huge fan of the melons. Whether honeydew, cantaloupe, canary or Santa Claus, they just don't rank up there in our top 10 fruit choices. Then again, my mom and I are loath to throw anything edible out (particularly higher priced items like fresh fruit), so when she had to leave on business for a week right after Thanksgiving (leaving half a gigantic honeydew, amongst other leftovers, in the fridge) I knew I had to do something to preserve it for later use. 

    DSCN8778Lucky for me, my stepfamily are skilled cocktail makers, and while they usually use juice or seltzer as a mixer having a simple syrup on hand adds an extra element of variety - as well as opening up the possibilities of homemade sodas and shaved ice. True to their name, simple syrups are easy to do as well - with this one, it was a case of pureeing the fruit, lightly cooking it with water, sugar and ginger, then stirring in a touch of acid and straining it. While I kept some in an old jam jar for home use, the rest I poured into a clean wine bottle and stashed in the freezer for Christmas gifts. It's a great way to keep the holiday party going the rest of the year! 

    Shared with Gluten Free Fridays

    Wednesday, May 1, 2013

    Almond Mocha (Sugar Free!)

    OK, you're going to have to bear with me. I know it's 20+°C and sunny outside right now. I know. Hot drinks are dropping from menus faster than a lit match from a firebug, and rich, sugary things aren't exactly bikini body fodder. But the good news is that you can still treat yourself to a rich, smooth mocha - this baby is not only great hot or iced, but tripled with 2 tbsp of almond butter added to it you can make a great popsicle, or churn it for ice cream! Don't worry about the sugar content affecting your Summer (or afternoon) plans either - I've finally come up with a mixture of stevia sweeteners that don't overpower the end result, hold up to heat and can be frozen without losing their delicate nuances.

    The first sweetener I added to my favourite unsweetened almond milk was my fairly standard liquid stevia, which was fine but didn't really support the cocoa flavour - alone I found it more overpowered the mix. Then I messed around with a few types of stevia powder in packets, which ranged from horrible and bitter to good but not sweet enough. When Pyure Brands offered me the chance to try out their stevia baking blend and packets, I knew the benchmark (for the packets at least) would be this afternoon treat. Combined with two drops of the liquid stevia, the organic packets were the perfect addition - plus I liked that they were made with agave fibre (inulin) for a bit of prebiotic goodness. I've made some other treats with the packets as well as the baking blend, and I'm impressed for sure!

    Shared with Waste Not Want Not Wednesday on Poor and Gluten Free

    Hot Almond Mocha

    Almond Mocha (Sugar Free!)
    Serves 1
    2 tsp unsweetened cocoa powder
    pinch sea salt
    1 cup brewed coffee
    1 cup unsweetened vanilla almond milk
    2 tbsp boiling water
    2 drops liquid stevia (use your favourite) 

    If serving cold:
    1. Stir together the coffee, almond milk and liquid stevia. Chill thoroughly.
    If serving hot:
    1. Combine the coffee and almond milk in a microwave safe pitcher and heat about 3-4 minutes, until hot, but drinkable.
    For both:
    1. Mix the stevia, cocoa and salt in a large cup (or a jug if serving two).
    2. Stir the boiling water into the dry mixture until completely combined, then slowly whisk in the almond milk mixture and liquid stevia.
    3. Serve and enjoy!
    Amount Per Serving
    Calories: 39.4
    Total Fat: 2.9 g
    Cholesterol: 0.0 mg
    Sodium: 185.7 mg
    Total Carbs: 6.8 g
    Dietary Fiber: 6.1 g
    Protein: 1.9 g

    *Note: Pyure gave me the products to review and use but all opinions are my own and are not paid for

    Sunday, December 30, 2012

    Pan Galactic Gargle Blaster

    Ever heard of a Pan Galactic Gargle Blaster? Well, if you've read (or seen) Douglas Adams' Hitchhiker's Guide to the Galaxy, you know of Zaphod Beeblebrox' intensely potent cocktail of interstellar potables. The effect of a Pan Galactic Gargle Blaster is apparently similar to having your brain smashed out by a slice of lemon (wrapped around a large gold brick). It has also been described in the novel as the alcoholic equivalent to a mugging; expensive and bad for the head.

    For this New Years' Eve, while I won't be having a huge blow-out fiesta here I know a few people who'll be hosts, and this is a great way to ensure your guests only have one or two drinks during the night! Of course, this is potent stuff just like it's literary inspiration - with 151 proof rum, 190 proof grain alcohol and nothing to cut the booze with, you will definitely need to pace yourself, and your liver!

    Pan Galactic Gargle Blaster
    Makes 4 (2-oz) shots
    2 oz Bacardi Limon (or lemon flavoured rum)
    3 oz Absolut Citron (or lemon flavoured vodka)
    1 oz Bacardi 151
    1 oz Goldschlager
    1 oz Everclear 95% (or Alcool)

    1. In a tall pitcher, stir together all the ingredients with a long, narrow swizzle stick or spoon handle.
    2. Chill thoroughly.
    3. Pour into rock glasses over an ice cube and serve immediately.
    Amount Per Serving
    Calories: 198.8
    Total Fat: 0.0 g
    Cholesterol: 0.0 mg
    Sodium: 2.0 mg
    Total Carbs: 4.1 g
    Dietary Fiber: 0.0 g
    Protein: 0.0 g

    Saturday, September 22, 2012

    Grape Simple Syrup and Grape Pancake Syrup

    If you've ever made your own cocktails, mocktails or flavoured sodas, you've undoubtedly heard of the useful ingredient simple syrup. In it's pure essence, the syrup is just equal parts sugar and water, heated together just enough to dissolve the sweetener into suspension. The liquid sweetener mixes much better into other liquids, especially those that are cold or cool like most alcohols and juices.

    Personally, I find the "original" simple syrup to be a bit, well, boring. I don't drink (which could be part of the problem!), but I do like making my own flavoured seltzers and jazzing up plain oatmeal. Both of these need something a little more unique than just sugar water (and before anyone goes there, I love fruit, maple syrup and brown sugar in oatmeal too), and when our Concord grapes were weighing down the vines I figured I'd try to make my own simple syrup with their juice instead of water!

    Since I was going for depth of flavour (so much for a "simple" syrup), I decided to use a mixture of sugar and dark amber honey to sweeten. It tasted fantastic on it's own, and the tangy nature of the grapes was a great balance for the other super sweet ingredients. Still, it only took a tiny amount to bring forth the flavour and sweetness that I was looking for in my applications, but for cocktails I'm sure you can get away with more. I can just imagine spiking a mimosa or daiquiri with a shot of this - or even turning a "Tequila Sunrise" into a "Tequila Sunset"!

    When my mom tasted the syrup as it was, she loved the flavour - "not super sweet but sweet enough" is how she phrased it. She then asked me if I'd be able to turn it into a syrup thick enough for pancakes or waffles! I told her I would try, and with a few tweaks I had "the best tasting pancake syrup" she'd had in a long time! I don't know about you, but I'll stick to my maple on flapjacks, but over ice cream or yogurt? Divine.

    Grape Simple Syrup
    Makes about 3 3/4 cups, 30 (1-oz) servings
    2 tbsp water
    1 1/2 lbs Concord grapes
    3/4 cup water
    1 1/4 cups sugar
    2 tbsp honey
    1. Place 2 tbsp water and the grapes in a saucepan, cover and simmer until the grapes have all popped and begun to disintegrate.
    2. Pour into a strainer lined with three layers of cheesecloth set over a large bowl. Allow to drain overnight.
    3. Place the juice into a saucepan and stir in the sugar and honey.
    4. Simmer until sugar dissolves, then pour into jars or bottles and store in the fridge.
    Amount Per (1-oz) Serving
    Calories: 45.3
    Total Fat: 0.1 g
    Cholesterol: 0.0 mg
    Sodium: 0.5 mg
    Total Carbs: 11.8 g
    Dietary Fiber: 0.1 g
    Protein: 0.1 g

    • To make a syrup perfect for pancakes, waffles or ice cream, add 1/4 cup sugar to the finished simple syrup and bring to a boil.
    • Cook, stirring enough to keep from boiling over, for 5-10 minutes, until reduced to your preference (syrup will thicken slightly as it cools).
    Amount Per (2-tbsp) Serving
    Calories: 38.8
    Total Fat: 0.1 g
    Cholesterol: 0.0 mg
    Sodium: 4.3 mg
    Total Carbs: 10.1 g
    Dietary Fiber: 0.1 g
    Protein: 0.1 g

    Friday, September 21, 2012

    Sugar-Free "Apple Cider" - #RecipeRedux

    Apple cider is going to be pricer than usual, according to the market watchers. As much as I adore a warming, slightly spicy and sweet mug of it in the morning (better than coffee, in my opinion!), it's expensive enough, and no way am I paying double or more for my seasonal fix. Herbal tea is relatively cheap, but can be a little lackluster when you're looking for something as rich, sweet and tangy as mulled cider. I figured that I'd shell out for a cup at the orchard after a round of picking and that would be it.

    Then I came across the blog Lexie's Kichen, and particularly this post for a Healing Sugar-Free "Apple Cider". Made with an apple-spice herbal tea, there's no actual apple juice in this at all, but gets sweetness from stevia and tang from raw apple cider vinegar. I figured I'd give it a try - after all, I already had some apple tea hanging around from last Fall and figured I should use it up! It took a few tweaks to get it to my taste, both by using a mix of powdered and liquid stevia as well as adding a dash of fresh lemon juice for a little more of a "rounded" flavour. Because I love caramel apple anything, I added a few drops of the butterscotch flavouring I had on hand to my first cup and was floored by how decadent it was. A sprinkling of cinnamon capped it off perfectly, and with the natural goodness in the vinegar and lemon juice it's also a delicious way to keep the Winter colds at bay too.


    This month's Recipe Redux is all about our favourite ways to use fermented foods. Since the full-sour naturally fermented dill pickles I adore I only ever eat au natural, I thought I'd share the new favourite I found in this spicy, sweet and tart beverage.


    Sugar-Free "Apple Cider"
    Makes about 8 cups
    8 cups water
    4 apple cinnamon herbal tea bags (President's Choice is what I use and love!)
    2 tbsp apple cider vinegar (I used Bragg's Raw Apple Cider Vinegar)
    1 1/2 tbsp lemon juice
    4 (1 gram) packets powdered stevia extract
    3 full droppers liquid stevia, to taste (I used NOW®'s alcohol free stevia glycerite)
    1 tsp (1 small bottle) LorAnn's concentrated butterscotch or caramel flavouring
    1. Bring water to a boil and pour over the tea bags in a large jar or pitcher. 
    2. Cover and let steep at room temperature overnight.
    3. Remove the tea bags and stir in the vinegar, lemon juice, stevia powder and liquid and the flavouring.
    4. Reheat gently or serve cold (I like a sprinkle of cinnamon on top).

    Not a significant source of calories, fat, cholesterol, sodium, carbs or protein. Approx. 2.2% of the RDA for vitamin C per cup.

    Also submitted to Foodie Fridays, Wellness Weekends and Gluten Free Fridays.

    Wednesday, September 5, 2012

    Brown Rice Cream

    Some of the time I see recipes that look amazing in every way except that they call for some sort of cream. A lot of the time the people I bake for can't have nuts or gluten either, and since I drink almond milk usually buying a whole carton of the less allergenic rice milk is cost prohibitive - especially if the recipe calls for only a half cup or so. We do, however, buy a lot of brown rice around here, and we always have leftovers when my mom makes stir-fries. Rather than throw out tons and tons of it, or let it go rancid (the stepfamily doesn't believe in leftovers and apparently has never heard of fried rice), I figured I'd do something useful with it and create a cream substitute at the same time.

    Unlike the more watery commercial rice milk, this version is as thick as heavy cream and works in any baking application requiring it. It doesn't whip, obviously, and I haven't tried it in caramel making yet but it's on my to-do list! My guess is that for caramel adding a tablespoon of coconut oil to the finished "cream" would prevent it from curdling. If you'd rather drink your rice milk, simply dilute the finished cream to your preference!


    Brown Rice Cream
    Makes about 2 cups of "cream" which can be diluted for a beverage if you like
    1 cup cooked brown rice
    3 1/4 cups water, divided
    pinch salt
    1 vanilla bean, split (optional)
    1 packet vanilla-flavoured stevia (optional)
    1/4-1/2 cup additional water
    1. In a saucepan, bring all the ingredients to a simmer.
    2. Partially cover and cook, stirring occasionally, for 40 minutes. Remove the vanilla pod if using.
    3. Scrape/pour mixture into a blender, add 1/4 cup water and puree until completely smooth.
    4. Add the additional 1/2 cup water if necessary to blend - it should be liquid but thick.
    5. Let stand 45 minutes - 1 hour.
    6. Line a strainer set over a bowl with cheesecloth and pour the blender mixture in. Let drain, discard the solids.

    Amount Per Serving (1 cup)
    Calories: 108.0
    Total Fat: 0.9 g
    Cholesterol: 0.0 mg
    Sodium: 5.0 mg
    Total Carbs: 22.4 g
    Dietary Fiber: 1.8 g
    Protein: 2.5 g

    Linked to #glutenfree Fridays Recipe Party #4

    Sunday, July 15, 2012

    Cool Coco - Limeade for #SundaySupper #BeattheHeat

    Thanks to this week's rain and windier weather, it's been a bit of an easier-to-live-with climate than last week's 40° C+ temperatures. Believe me, I'm not complaining about the heat - God knows it will be back to the frigid ice-caked Winter all too soon. When it is nice and warm (some would say hot) out, I fling on a tank top, shorts, hat, sunglasses and my SPF 75 and get out into the garden, where my tomatoes and pineapple groundcherries are just relishing the favourable weather. Of course, I make sure to hydrate properly - both the plants and myself need extra fluid and nutrients in the heat!
    While the plants get an organic green cocktail of kelp and veggie plant food mixed with their water, I was never a huge fan of the green juice myself.

    I am a huge fan of just plain water, and recently have been experimenting with adding some healthy flavourings to create my own gourmet "spa water". Being the season that it is, frozen berries, cherries, peaches, melons and even pineapple make delectable ice cubes, and steeping a combination of fresh mint, lemon slices and cucumber in a pitcher of plain H2O overnight makes for an ideal water bottle filling. As a bonus, by using the real fruit rather than a syrup or juice means that you get it's nutrients both in your water and when you eat the leftovers! For example, pineapple is filled with micronutrients needed to kick start your metabolism, and there are a host of antioxidants in all types of in season fruit.

    But if you really need something "more" than a cool glass of water, I "Beat the Heat" with this accompaniment to a no-cook or outdoor grilled #SundaySupper - a bright, tangy limeade made with coconut water. Instead of watering down the delicate balance of sweet and sour with ice, I add frozen Summer berries that release their own delectable nectars as they thaw. Whatever's left in the glasses or jugs afterwards makes for a lightly coconutty fruit salad that you can either scoop out with a spoon or dress up with coconut milk and other tropical fruit for dessert!


    This week's #SundaySupper is being hosted this week by Jen from Juanita's Cocina and is all about cooling off with no-cook, chilled out foods. Check out the other participant's refreshing options below:

    #BeatTheHeat Appetizers:

    #BeatTheHeat Salads, Soups, & Sides:

    #BeatTheHeat Main Dishes:

    #BeatTheHeat Desserts:

    #BeatTheHeat Drinks & Cocktails:

    Wine Pairings Provided By: ENOFYLZ